Showing posts with label family. Show all posts

Wednesday, May 21, 2014

Monochromatic Madness with Whisker Graphics: A layout & a card


I've gone mad, I tell ya! [said in my best mad-scientist voice] Okay, perhaps I haven't completely lost it, but I am pretty coo-coo for color. Especially the various trends on the crafting scene that incorporate painting. So when the awesome loves at Whisker Graphics asked me to select a few products to work with here on the ole blog, I was instantly drawn to these gorgeous tags!


They were just the right size for putting my new Instax Share Printer to work on a layout. Here's how my page began:

Do It To It: The Photos
Knowing I wanted to document a few photos I snapped of Mags in front of a cool rainbow wall downtown, I added those pics to my photo's camera roll and printed them to my Instax Share Printer using the free Instax app. I'll have to go into this in more detail in another post. But I can tell you this printer rocks my socks!


The Polaroid-style film fits perfectly on the large tags, and my prints were ready in minutes!


Do It To It: The Background
For the background, I grabbed my Watercolor Wonder Crayons from Stampin' Up! and set to work on creating my own colorful cardstock, using the colors of the tags as my inspiration.


First, I colored four columns—no fancy business here, just some shloppy scribbles will do.


Then I took my brush, some water, and set to blending the crayons, creating a soft, watercolored backdrop for my tags.


Once things were dry, I trimmed the 12x12 down to 11x11 (approximately) and matted it to heavy-weight gold cardstock, using my sewing machine. The reason being, the paper curls a bit when you watercolor, and anchoring it to heavy-weight cardstock keeps it flat and secure.


Next, I applied a bit of spray ink to the page for a splattered effect. I did my best to stick with the monochromatic-ness of it all, but the ink tends to wander. I'll be honest, I'm not in love with this detail and would probably change it if it were a simple fix, but I'm not about to start the page over now when I only sort of dislike. KWIM?


Do It To It: The Title
Inspired by the first line in John Mayer's song, "Daughters," I reached for my spray ink again to write "I know a girl." Like this idea, but the yellow tone-on-tone proves a bit tricky to read. Especially in the photo. It's not so bad here at home.

For "She puts the color," I used a large white shipping tag from Whisker Graphics.


I actually wrote "color" with my Watercolor Wonder Crayons and used a water brush to blend the letters—a very cool way to create a watercolored brush script. You should try. Just go easy on the water and don't be afraid to apply more crayon color as needed.


I completed the line—"inside of my world"—by adding Studio Calico stickers to the tags holding my stickers.


Is the song stuck in your head now? It's been in mine for days. If not, let's see if I can help you out. ;)


Do It To It: The Journaling
Wanting to tell the full story of my lovely rainbow-wall I find in downtown Salt Lake City, I knew I'd need ample page space, but I didn't want to disrupt the simplicity of the design, so I incorporated hidden journaling beneath the tags.


It's an easy approach. Simply score the tops of the tags and stitch above the score line using a sewing machine to adhere them to your background.


Now the tags work as flaps!


And I selected pens that matched the colors of my columns to keep the monochromatic feel going. (Except for the yellow. Learned from my title that yellow-on-yellow isn't ideal, so I went with a tan Sharpie.)

There you have it. This page was a fun afternoon art project, and I love the way the Whisker Graphic Tags work to both mat my photos and house my journaling. Thanks for that, WG!


Whew! That looks like more work than it is. Promise. I just like to really break things down for sake of explanation. I actually completed this page in under an hour, which is a massive record for me. I hope you'll give it a try. Or at least aspects of it. Especially those pretty Whisker Graphics tags. Thanks for sending them.

Birthday Card Quickie
I could seriously play with Whisker Graphics goodies all day. (If only time were more accommodating), so I put together one more little project. This time, using these amazing bitty treat bags.
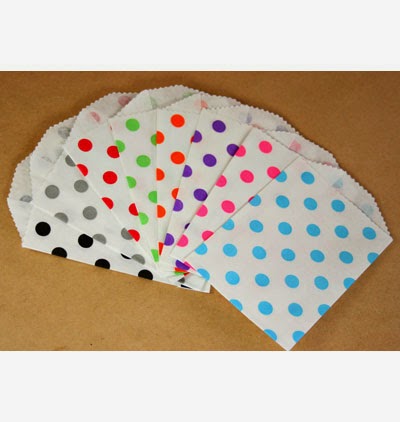
Image credit: Whisker Graphics


It's a little flip, interactive birthday card. It's for a sweet two-year-old, so I wanted to make it colorful and fun. Enter: doodling!


For her name on the front, I simply used the brush-script approach I've so enjoyed these days. For the inside pages, I turned to my awesome Sharpie assortment. Gotta love da Sharpies!


Creating the pages is as easy as stacking the bitty bags evenly on top of one another and sewing along the left (closed) edge. I used a zigzag stitch for extra reinforcement.


I had the idea of tucking a Whisker Graphics tag (large) into each pocket but found I didn't need to after doodling on each bag front, so I saved that surprise for the last pocket, where I placed a little love note.

I'm definitely going to take this card approach again soon, as I can see it being an awesome gift-card holder, money holder, etc. And it was so super easy and fun to make. What a treat!

Thank YOU for stopping in today! And thanks to Whisker Graphics for inviting me to be part of their May fun. Between my Mother's Day card and these projects, I've thoroughly enjoyed myself. Your goodies rule!

Cheers!
Megan

Quick Follow-up Question: I'm currently preparing an interactive card class (so fun!). Tell me, would you make a card out of treat bags like this (and this)? Your feedback on my last post was SO helpful (thank you!) that I thought I'd seek it here as well. Many thanks!

Sunday, August 12, 2012

Onesie... twosie... threesie...


Monthly onsies... a project I've had in mind since before my dear Mags arrived. I thought they'd be a cute way to track her growth during her first year. Alas, I didn't complete them until month two of her sweet life, which means onesie one is out of the picture. But, better late than never, I suppose.

Here's the plan: I'll sit her in her cute rocker wearing the onesie that coincides with her current month of age and snap a picture. Lambie will join her to help illustrate her growth. 

How the onesies came together:

Step 1: Purchase onesies for months 1 (or two, in my case) through 12, wash them, and iron them.

Step 2: Select fabric for your numbers and iron fusible webbing (stiffener) to the back of each piece. This is a two-sided iron-on material that will allow you to die-cut your numbers and iron them to the onesies. I used Ultrahold Heat-n-Bond by Therm O Web.  

Step 3: Use a die-cutting machine to cut your numbers. I used the Fabrique by Making Memories. Note: If you don't have a die-cutting machine, you can use stencils to trace numbers and cut them out, or you can simply freehand cut them out. It's up to you!


I cut four of each number so I can make extra sets to give as gifts. 

Step 4: Iron the numbers on the onesies. 

Step 5: Take your photos onesie... errr, once a month. ;) 


Since I was a slacker and missed month one, I'm starting with month 2. (How can my baby girl be two months old already?)

You'd think the photo taking would be the easy part. Yeah, not so much. Here are just a few of the MANY outtakes. 
When ever there's a camera out, Jack has to make an appearance.

Reese (dog speak for "cheese")

Going...

Going... 

Gone! 
Whew! This picture-taking business is hard work.


Cheers!

BTW, I'm thinking about selling these onesie sets. If you're interested in purchasing a set, please e-mail me at M2E2G at aol.com. I'm happy to use colors that work for your needs, and I can do sets for boys, girls, or I can keep 'em gender neutral. Just let me know. :)

Thursday, August 9, 2012

The Name Game: Nursery Decor

Foolish me. I thought maternity would leave me with all this free time to create. Umm... not so much. I've pretty much spent every free minute of this happy time holding my sweet girl. BUT, I have managed to squeeze in a few crafts, including decor for Miss Maggie's room.

As soon as I saw these frames and letters from BasicGrey, I knew I had to have them for Mag's nursery. I filled them with fabric—the same fabric I used on the banners I made for her special space.

If you like this look, you can create it in a few simple steps:


1. Select your frames, letters and fabric. Iron the fabric.
2. I used spray adhesive to attach the letter negatives to the fabric.
3. Smooth out any air bubbles. (BTW, is it me or does my hand look VERY freaky in this photo? It bugs. Like Penguin's flipper or something. Yuck!)
4. I backed my fabric with white cardstock to make the fabric pop more than it would if I had just framed it without a backing.
5. Frame the fabric-backed letter.

You'll have to excuse the reflection. Shooting glass with a cell phone doesn't make for the best shot. 
These letters are actually two projects in one, as you can use the negative shape (above), as well as the positive shape (the letter you punch out), which is what I did for the M.


Here's a closer look at each letter. I adore the splash of color this adds to Maggie's room. And she seems to dig it... well, as much as a two-month-old can dig wall art. :)


More baby crafts to come soon. Until then, I hope this one brings a smile to your face. Thanks for stopping by.

Cheers!

Thursday, May 31, 2012

Eight Things at 38 Weeks


From the looks of my ever growing belly, my baby girl’s arrival is just around the corner. The end of this miraculous stage is fast approaching. Of course, the thing I look forward to the most is meeting this little person who has been keeping me company for the better part of the year. What a moment that will be!
There are a few other things that I’m looking forward to. Nothing that compares to meeting my babe, but things. In honor of the 38 week milestone, here are just eight of those things:
1. Wearing shoes other than flip flops. Right now, my swollen feet won’t fit into anything else. Good thing warm weather is here.

2. Drinking a Red Bull. Oh, how I miss my wings. 

3. Bending over to pick things up without moaning and groaning. 

4. Walking without a waddle. 

5. Sleeping through the night without having my bladder wake me several times. Of course, that will likely be replaced with a babe waking me, but that’s A-okay with me. 

6. Drinking the occasional cocktail with dinner. Mmmm...

7. Wearing something other than the six-ish outfits I currently have available to me. 

8. Fully embracing Cory again. Bring on the bear hugs! 

Cheers!