Showing posts with label cards. Show all posts

Wednesday, May 21, 2014

Monochromatic Madness with Whisker Graphics: A layout & a card


I've gone mad, I tell ya! [said in my best mad-scientist voice] Okay, perhaps I haven't completely lost it, but I am pretty coo-coo for color. Especially the various trends on the crafting scene that incorporate painting. So when the awesome loves at Whisker Graphics asked me to select a few products to work with here on the ole blog, I was instantly drawn to these gorgeous tags!


They were just the right size for putting my new Instax Share Printer to work on a layout. Here's how my page began:

Do It To It: The Photos
Knowing I wanted to document a few photos I snapped of Mags in front of a cool rainbow wall downtown, I added those pics to my photo's camera roll and printed them to my Instax Share Printer using the free Instax app. I'll have to go into this in more detail in another post. But I can tell you this printer rocks my socks!


The Polaroid-style film fits perfectly on the large tags, and my prints were ready in minutes!


Do It To It: The Background
For the background, I grabbed my Watercolor Wonder Crayons from Stampin' Up! and set to work on creating my own colorful cardstock, using the colors of the tags as my inspiration.


First, I colored four columns—no fancy business here, just some shloppy scribbles will do.


Then I took my brush, some water, and set to blending the crayons, creating a soft, watercolored backdrop for my tags.


Once things were dry, I trimmed the 12x12 down to 11x11 (approximately) and matted it to heavy-weight gold cardstock, using my sewing machine. The reason being, the paper curls a bit when you watercolor, and anchoring it to heavy-weight cardstock keeps it flat and secure.


Next, I applied a bit of spray ink to the page for a splattered effect. I did my best to stick with the monochromatic-ness of it all, but the ink tends to wander. I'll be honest, I'm not in love with this detail and would probably change it if it were a simple fix, but I'm not about to start the page over now when I only sort of dislike. KWIM?


Do It To It: The Title
Inspired by the first line in John Mayer's song, "Daughters," I reached for my spray ink again to write "I know a girl." Like this idea, but the yellow tone-on-tone proves a bit tricky to read. Especially in the photo. It's not so bad here at home.

For "She puts the color," I used a large white shipping tag from Whisker Graphics.


I actually wrote "color" with my Watercolor Wonder Crayons and used a water brush to blend the letters—a very cool way to create a watercolored brush script. You should try. Just go easy on the water and don't be afraid to apply more crayon color as needed.


I completed the line—"inside of my world"—by adding Studio Calico stickers to the tags holding my stickers.


Is the song stuck in your head now? It's been in mine for days. If not, let's see if I can help you out. ;)


Do It To It: The Journaling
Wanting to tell the full story of my lovely rainbow-wall I find in downtown Salt Lake City, I knew I'd need ample page space, but I didn't want to disrupt the simplicity of the design, so I incorporated hidden journaling beneath the tags.


It's an easy approach. Simply score the tops of the tags and stitch above the score line using a sewing machine to adhere them to your background.


Now the tags work as flaps!


And I selected pens that matched the colors of my columns to keep the monochromatic feel going. (Except for the yellow. Learned from my title that yellow-on-yellow isn't ideal, so I went with a tan Sharpie.)

There you have it. This page was a fun afternoon art project, and I love the way the Whisker Graphic Tags work to both mat my photos and house my journaling. Thanks for that, WG!


Whew! That looks like more work than it is. Promise. I just like to really break things down for sake of explanation. I actually completed this page in under an hour, which is a massive record for me. I hope you'll give it a try. Or at least aspects of it. Especially those pretty Whisker Graphics tags. Thanks for sending them.

Birthday Card Quickie
I could seriously play with Whisker Graphics goodies all day. (If only time were more accommodating), so I put together one more little project. This time, using these amazing bitty treat bags.
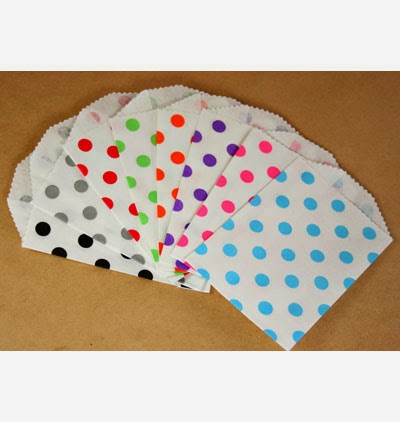
Image credit: Whisker Graphics


It's a little flip, interactive birthday card. It's for a sweet two-year-old, so I wanted to make it colorful and fun. Enter: doodling!


For her name on the front, I simply used the brush-script approach I've so enjoyed these days. For the inside pages, I turned to my awesome Sharpie assortment. Gotta love da Sharpies!


Creating the pages is as easy as stacking the bitty bags evenly on top of one another and sewing along the left (closed) edge. I used a zigzag stitch for extra reinforcement.


I had the idea of tucking a Whisker Graphics tag (large) into each pocket but found I didn't need to after doodling on each bag front, so I saved that surprise for the last pocket, where I placed a little love note.

I'm definitely going to take this card approach again soon, as I can see it being an awesome gift-card holder, money holder, etc. And it was so super easy and fun to make. What a treat!

Thank YOU for stopping in today! And thanks to Whisker Graphics for inviting me to be part of their May fun. Between my Mother's Day card and these projects, I've thoroughly enjoyed myself. Your goodies rule!

Cheers!
Megan

Quick Follow-up Question: I'm currently preparing an interactive card class (so fun!). Tell me, would you make a card out of treat bags like this (and this)? Your feedback on my last post was SO helpful (thank you!) that I thought I'd seek it here as well. Many thanks!

Monday, January 16, 2012

A New Year's Greeting

Despite the best of intentions, I only got a portion of my Christmas cards out on time. No worries. That’s what New Year's greetings are for, right? I hope so, because that’s the route I took. I made these cards for some of those on my card list. 
Unlike traditional cards, I used a small kraft sack as my card base (instead of paper). 

I stamped the word “wishes” and the actual wishes tags using an alphabet set from Clear & Simple Stamps


I then cut the sack down a little using pinking sheers.


Using a small circle punch, I punched a tab in the bag.


I stamped a few of the things I wish for my friends this year. 


I stamped the date on an office tag, using a doily set from Studio Calico and a vintage numbers set from Cavallini & Co. *swoon*


I ADORE these bitty clips from Stampin’ Up! It added just the little detail I was looking for. 


For a little texture, I sewed on the wish tags and stitched the tag to the paper sack. 


To finish things off, I made envelopes using an envelope template and cardstock. Don’t you LOVE the decorative shipping label? They’re a favorite new item of mine. They’re from TapeSwell.


These 2012 greetings actually came together rather quickly. I had fun looking at cards in a different, less traditional way. I hope you like the idea and will do the same.
Happy 2012! I wish you: 
Peace
Joy
Love
Hope
Cheers!
Megan

Saturday, October 1, 2011

Happy World Card Making Day!


It’s time to create & celebrate. Today is World Card Making Day (WCMD)! I adore shaped cards, so I put together a few using a sheet of paper from Bella Blvd. to share with you in honor of this fun day. 

I love the large shapes on this Sunny Happy Skies paper from Bella Blvd. They make quick and cute shaped cards. 

It was as easy as cutting out the different elements from the paper (tree, house, and ice cream) and connecting them to cardstock backings, which I cut following the shape of the cards.  


I think the house is my favorite. For me, it’s the little details that make it extra fun (the door that opens, the flowers by the door, and the sun and cloud in the sky). I already sent it to a friend who had invited me to her home, but you could also use a card like this for a Welcome to the Neighborhood and Moving card.

This would make a fun birthday card for someone who loves their ice cream with sprinkles on top. But the “You’re Sweet” sentiment would also make this card work for a thank-you.


And I sent this one to Mom and Pop. It’s always a good time to tell someone you love them. If you aren’t sure what card(s) to make this WCMD, why not do a love note for someone(s) special in your life?


Happy WCMD, my crafty friends! I hope you’re doing something fun to create & celebrate this special occasion. 
Cheers!

Saturday, February 5, 2011

A special card-making poem by my own dear mama!

I seriously have the cutest mom around. Not only is she my biggest fan, attending all of my local boutiques and classes (even when they’re repeats), but she’s also a talented poet. Last Valentine’s Day she sent me a handmade Valentine with this poem included. It’s the best poem I’ve ever read, and I've been waiting a year to share it with you. If this doesn’t get you in the mood to create love notes, I don’t know what will. Enjoy! :)
Dear Megan,
I’ve used my Stampin’ Write Markers, 
And squeezed my squeezin’ punch.
I employed fussy cuttin’,
And used brads by the bunch.
I peeled and adhered 3D foam squares, 
Pulled out “Click-n-Sticks” for a mile,
And sorted out perfect cardstock,
From a multi-colored pile. 
I spared no painstaking effort, 
Applying rub-ons and my stick of glue.
All of my supplies were “archival safe,”
And, of course, “acid free” too!
My stamps of hearts and flowers, 
Adorned with colors, rare. 
From clever, fold-up ink pads,
That I used with a great deal of care. 
Pretty ribbons and lovely self-adhesives,
Took their special place, 
So each had an eye-catching style,
Of flow, and flair, and grace. 
I was extremely proud and happy,
When my Valentine production was through.
I’d used techniques learned from an expert,
At the classes I took from you!
Love, 
Mom

Isn't she amazing? I sure think so! Love you, Schmom! 


Cheers!

Monday, November 22, 2010


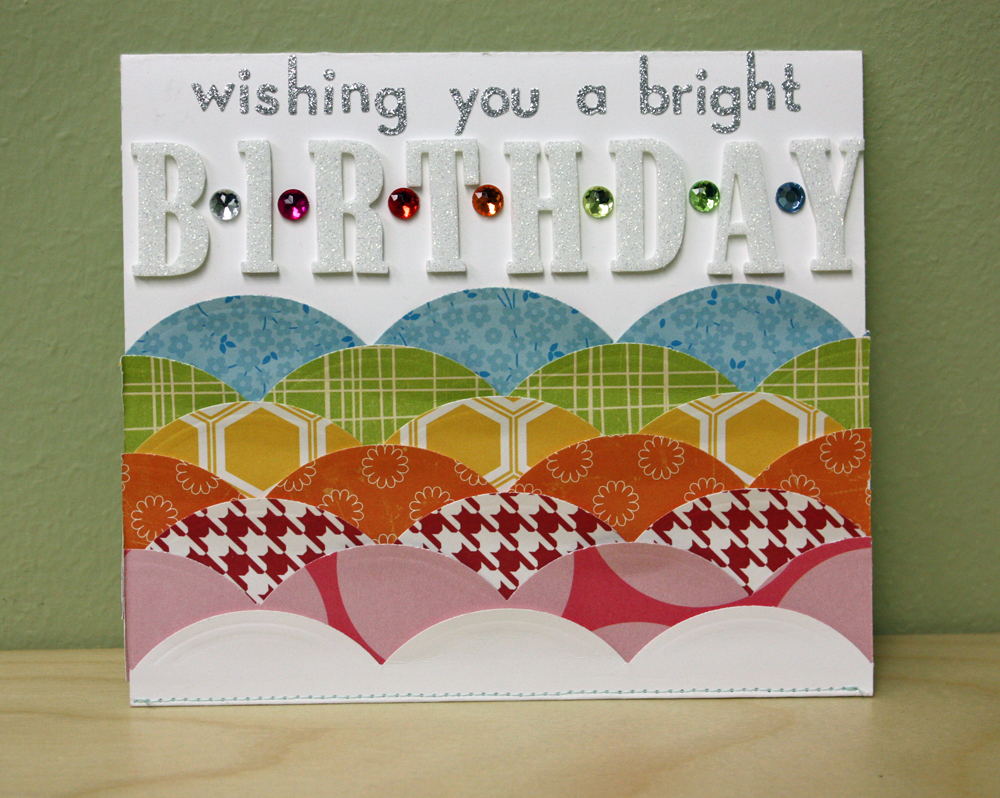
Build a birthday card from border strips. I created this colorful design by punching several pieces of patterned paper with an EK Success scalloped border. I then staggered the scallops on the front of my card base, layering from the top, down.


My favorite part of this card is the flap that the card front slips into. To create it, I punched a scalloped border in the bottom of my card base. I then folded the edge over and stitched it into place. Now the front of the card tucks neatly inside to hold the card closed.


Following the same rainbow color scheme (and order), I made the letters in my sentiment stand out with colorful bits of bling. This card came together quickly. It’s a good one to try the next time you need a bright design that you can make from scraps in minutes.


Wishing You a Bright Birthday. Supplies: Cardstock: Bazzill Basics Paper; Patterned paper: Bella Blvd and Jillibean Soup; Letter stickers: EK Success and Making Memories; Border punch: EK Success; Bling: Doodlebug; Adhesive: Scrapbook Adhesives by 3L. 

Cheers!

Tuesday, November 9, 2010

Thx and a card how-to


I have much to be thankful for, so I decided to share this Thx card with you. But I’d first like to thank a few friends:


  1. Skipping Stones Designs for raising more than $1,000 for the Susan G. Koman Foundation last month in their blog hop. (BTW, today is the last day of an awesome 33% of promotion they have going on. If you’re in the market for new stamps, you should check them out.)
  2. My talented friend Kimber, who helped Skipping Stones reach their wonderful goal by placing the winning bid for my cards and bracelet, as well as all of the other beautiful friends who put in bids.
  3. My dear friend Reyanna, for sending a random package of kindness my way. It came just when I needed it, sweet girl!
  4. My incredible pal Holly, who hosted an awesome craft boutique last Friday and let me participate. And all of the happy friends (new and old) who came out to enjoy a little creative fun.


What a delightful list! Now, let’s put this card together:


Step 1: Accordion fold strips of dictionary paper and fold to form flower shape; color flower with spray ink.


Step 2: Stamp “Thx” and punch out sentiment with circle punch. Adhere sentiment and splash of tulle to center of your accordion flower.


Step 3: Color doily with spray ink, cut doily into fourths, and fold fourth into cone to create leaf. Adhere leaf to card base with sewing machine.


Step 4: Cut strip of dictionary paper and stitch to card base to create grass.


Step 5: Attach flower to top of stitched stem to complete card.


Supplies: Cardstock: Die Cuts with a View; Stamp: American Crafts; Ink: Stampin' Up!; Spray ink: Tattered Angels; Glitter pen: Copic; Circle punch: Martha Stewart Crafts; Adhesive: Beacon's; Other: Dictionary paper, doily, and tulle.


Thx for visiting today!